How I Organized and Transformed My Craft Room

My craft room has been such a mess for the past two years that I have been crafting everywhere else in the house except for the craft room.
A couple of weeks ago, I finally got tired of it and committed to organizing it and keeping it clean and neat.
Today, I want to share with you the steps that I followed that totally transformed my craft room.
1. Assess what is and what is not working
Over the past few weeks, I read every article and watched every video on organizational strategies that I could find, and so I had a pretty good idea of what was working and what was not working for me.
The shelves of miscellaneous metal items were a jumbled mess and things were always falling off. The picture frame and wood decor storage was not working as half of it was on the floor. The bookcase in the doorway was full of clutter.
On the other hand, my paintbrushes and paint were well organized on a cart, and I was pretty happy with the storage I was using for both my ribbons and for my sewing supplies. I had worked out a system that I liked for my floral accessories, but the faux flowers and plants themselves were a disaster.

2. Function first
Focusing on function and not appearance, I ordered some open storage that I knew would work for me, even though it was not especially attractive. I assembled some clear cubes to store my fake flowers, which was a bit of a pain, but I arranged the cubes in any configuration that I liked to fit my space.
I ended up dividing the cubes into two separate units, one larger one for my flowers and a second smaller one. I had originally intended on organizing the flowers by color and just shoving one color in each of the cubes, but I ended up putting them in clear tubs first.
3. Group like items together
Grouping similar things, like I did with my paint and paintbrushes and with my ribbon, will make it so much easier to maintain a good organizational system. I started by collecting up all the wood for crafting from various areas and putting them in the metal shelving unit that had previously held my flowers.
I grouped items together by size and shape in each drawer. Then I arranged all my picture frames by size in an old armoire that was in the room. I also grouped together trays and plaques that I had thrifted.
4. Give everything one home
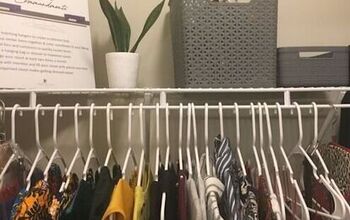
Once items are grouped together, put them all in one place. You do not want to be looking for something in three or four different places when you need it. I moved all of my nail screws and other hardware into some bins, placed small glass jars and test tubes on the shelves with all of my other glass items, and removed everything but china from my bookshelf.

5. Configure storage to complement your supplies
Your storage should fit your supplies, not the other way around. I moved the candlesticks and the metal items to the closet where the shelves were deeper and things would not get knocked to the floor, and moved the glass items to the bookshelf where I could actually see them. I also cut some old wood to make a few more shelves.
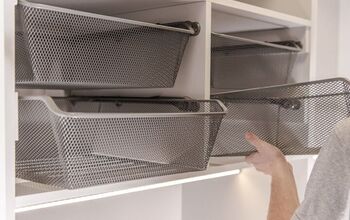
6. Use vertical space
To get everything up off of the floor, I had to use every inch of the wall space available. I decided to attach two wire baskets to the wall to store my rolls of wallpaper and gift wrap, and I did the same with some wicker baskets for my Cricut vinyl. I also screwed a hook into the wall next to my Cricut machine to get my Cricut mats up off of the floor. Finally, I used a wall organizer for all of my special printer papers.
7. Use clear containers
Clear or open storage is key, because out of sight is truly out of mind. In this reorganizing session, I found so much stuff I had forgotten I had. This is why I opted for clear acrylic containers instead of my old gray ones.

8. Create work stations with most used supplies within arms reach
With my desk now organized and my work table cleared off, I had a perfect place to glue, paint and work with florals, with everything close at hand. But I still needed to create a few other stations, including a sewing station and a paper cabinet right next to my printer.
9. Label everything
One rule that all the professional organizers can agree upon is the need to label everything. This is especially important in containers where you cannot see the contents, but also crucial to maintain your organization, even when you are using clear containers. I labeled my nails, screws and other fasteners for easy access.
10. Make it pretty
I learned the hard way that only after everything else is accomplished, should you make your craft room pretty. When I first turned this room into a craft room, I focused too much on pretty and not enough on function, there were no organizational systems in place, and the room ended up a disaster.
I have some ideas for ways I can make my craft room more attractive in the future, but for now I am settling on a few basic things, like a bit of art on the walls, fresh contact paper on the countertop, and a couple of coats of white paint on my work table.
If you want to stay organized, you need to make adjustments as soon as you notice that something is not working. As soon as I realized that my clothes pins needed to be in the bins with the other wood items, I moved them. Also, because I use my drill multiple times in a day, I realized I needed to have my drill bits easily accessible and easy to organize, so I grouped them by size, put them in cups, and left them out on my desktop.
Craft room organization
I hope this was insightful and gave you inspiration to finally tackle the space that you know you need to reorganize. What step do you find the hardest? Where do you usually get stuck? Share in the comments, and maybe you will get some useful advice!
Next, check out my Easy and Budget-Friendly Bedroom Makeover Ideas.


![101 Items to Get Rid of With No Regret [Free Declutter List]](https://cdn-fastly.thesimplifydaily.com/media/2022/08/30/8349390/101-items-to-get-rid-of-with-no-regret-free-declutter-list.jpg?size=350x220)

Comments
Join the conversation