How Much Does a Ford Transit Conversion Cost? Here's the Breakdown

I recently completed a DIY van project and today, I'm going to break down the Ford Transit conversion costs with you. I've kept every receipt, so I'll split the different categories of cost, then reveal the grand total at the end.
I saved money where I could, and I spent money on quality things where I needed to, like the fridge and the oven. I also saved a ton of money by doing things myself from scratch, like building the aluminum ladder and roof rack.
Are you wondering about the cost of converting a Ford Transit into a camper? Keep reading!
Note that all costs are listed in Australian dollars (AUD). 1 Australian dollar is around 0.68 US dollars.
The van
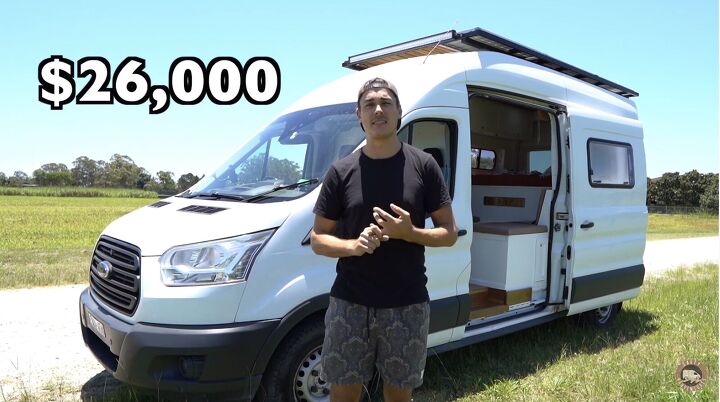
To kick this off, we'll start with our van. It is a 2014 Ford Transit 350L LWB (Long Wheel Base) High Roof. We bought the van secondhand. It had 150,000 miles on it, and it was AUD26,000 (USD17,650).
Insulation
The first thing you do when building a van is start laying down the insulation. We live in Australia in a pretty mild climate, so we didn't have to go crazy. For Arctic temperatures, we use a 15-millimeter foil board and polyester insulation, which cost AUD350 (USD235) for the total insulation.
Ventilation
The next thing you want to sort out is ventilation. We put in three additional windows, two pop-out windows, and a sliding window at the back which totaled AUD780 (USD530) just for the windows. We also put in a roof vent, which cost AUD130 (USD90).
We also got a Sirocco II Elite Fan in the back, which the awesome people at Caframo sent us, which would typically cost AUD350 (USD240). So the total ventilation costs were AUD1,320 (USD900).
Electrical system and water
The most expensive part of your build is going to be your electrical system. All of our electronics are kept under the seats. We've got a Renogy 2000-watt inverter, a 50-amp DC charge controller, and a Renogy battery monitor.
We've got 135-amp power, a lithium deep cycle battery, two 200-watt solar panels on the roof, and one 100-watt solar panel on the roof. So this is a 500-watt solar system, which is more than enough for our needs.
The total cost for the solar system was about AUD1,600 (USD1,090). Now, that might not sound like a lot, but that doesn't include the rest of the electrical system, like the cables, fuses, switch boxes, light switches, lights, and all that stuff; which add up to about AUD730 (USD500).
So in total, our electrical system, with all the lights and batteries, costs around AUD2,300 (USD1,560).
We run a propane system for our hot water and our oven. For our water system, we have an 85-liter underslung tank, which costs AUD240 (USD160). A 45-liter gray water tank cost AUD60 (USD40). Our filler port on the side cost AUD40 (USD27). We have a Seaflo water pump, which costs AUD120 (USD80), and our water level gauge costs about AUD200 (USD135).
For our gas system, the fiberglass gas box where you hold the propane tank was AUD379 (USD260). Our gas water heater was AUD990 (USD670). And then finally, we spent AUD900 (USD610) on a certified gas fitter to fit all the gas fittings in the van.
For the water system, I used a SharkBite PEX system, which is good because it's designed for DIY. You don't need any special tools. So, in total, the complete cost of our water and gas system was AUD3,726 (USD2,530).
Kitchen
I built our kitchen entirely from scratch out of 2 by 4s, stripped down into 2 x 1s. I saved a ton of money and a ton of weight doing it this way.
The main components of our kitchen are our fridge and our oven. The refrigerator is a 12-volt, 65-liter Bushman's Australian-made compressor fridge, which costs AUD1,050 (USD710). The oven is a Thetford three-burner stove and oven combo, which costs AUD1,033 (USD700). Our mixer tap was AUD129 (USD88), and our sink was AUD99 (USD67). Our splashback tiles with grout adhesive and everything were AUD182 (USD125).
Bed
For the bed, we didn't want to skimp on quality. This is a 135-centimeter (53 inches) high-density foam mattress with a memory foam topper we bought for AUD514 (USD350). For the cushions and the fabric, we purchased ourselves for AUD330 (USD225). We outsourced the sewing o a seamstress, which cost us AUD200 (USD135). The total cost for the cushions and fabrics was AUD530 (USD360).
Aluminum
For the aluminum ladder and rooftop deck, the total aluminum cost was AUD400 (USD270). The light bar on the front was an additional AUD123 (USD83). The total build costs for this ladder and roof rack system cost me AUD723 (USD490).
I've added up all the consumables that I've used. That includes glue sealants, paints, primers, wood sealers, razor blades, sandpaper cutting discs, and everything you see that doesn't go back into the van was AUD991 (USD670).
Finally, to convert this van to a legal motorhome in Australia, we got it certified by an automotive engineer. The total cost of getting this certified cost AUD1,920 (USD1,300).
I also budgeted for a couple of tools I bought to convert this van. That's not including all the power tools I already had; that was AUD562 (USD380).
Total Ford Transit conversion cost
Now for the final cost. This total build with the van costs AUD43,543 (USD29,550). I'm stoked because I know many people spend a lot more money buying pretty much everything off the shelf. You save a lot of money if you build things yourself.
Just keep in mind I estimated I saved about AUD7000 (USD4,750) just from doing things myself, like the ladder and the roof rack, and just spending smart, buying high quality where it's necessary, and then not buying the best when you don't have to.












Comments
Join the conversation